loading...
30-06-2010 14:17

Cách tạo calendar giống ứng dụng iCal của iPhone với jQuery


Hướng dẫn cách tạo calendar với sự kiện cho từng ngày giống ứng dụng iCal của iPhone.

1

Tạo một table thể hiện các ngày trong tháng

<table cellspacing="0">
	<thead>
		<tr>
			<th>Mon</th><th>Tue</th><th>Wed</th>
			<th>Thu</th><th>Fri</th><th>Sat</th>
			<th>Sun</th>
		</tr>
	</thead>
	<tbody>
		<tr>
			<td class="padding" colspan="3"></td>
			<td> 1</td>
			<td> 2</td>
			<td> 3</td>
			<td> 4</td>
		</tr>
		<tr>
			<td> 5</td>
			<td> 6</td>
			<td> 7</td>
			<td> 8</td>
			<td class="today"> 9</td>
			<td>10</td>
			<td>11</td>
		</tr>
		<tr>
			<td>12</td>
			<td class="date_has_event">
				13
			</td>
			<td>14</td>
			<td>15</td>
			<td>16</td>
			<td>17</td>
			<td>18</td>
		</tr>
		<tr>
			<td>19</td>
			<td>20</td>
			<td>21</td>
			<td class="date_has_event">
				22
			</td>
			<td>23</td>
			<td>24</td>
			<td>25</td>
		</tr>	
		<tr>
			<td>26</td>
			<td>27</td>
			<td>28</td>
			<td>29</td>
			<td>30</td>
			<td>31</td>
			<td class="padding"></td>
		</tr>
	</tbody>
	<tfoot>
		<th>Mon</th><th>Tue</th><th>Wed</th>
		<th>Thu</th><th>Fri</th><th>Sat</th>
		<th>Sun</th>
	</tfoot>
</table>
2

Viết CSS để định dạng cho table này

table {
	border-collapse: separate;
	border: 1px solid #9DABCE;
	border-width: 0px 0px 1px 1px;
	margin: 10px auto;
	font-size: 20px;
}
td, th {
	width: 81px;
	height: 81px;
	text-align: center;
	vertical-align: middle;
	background: url(../img/cells.png);
	color: #444;
	position: relative;
}
th {
	height: 30px;
	font-weight: bold;
	font-size: 14px;
}
td:hover, th:hover {
	background-position: 0px -81px;
	color: #222;
}
td.date_has_event {
	background-position: 162px 0px;
	color: white;
}
td.date_has_event:hover {
	background-position: 162px -81px;
}
td.padding {
	background: url(../img/calpad.jpg);
}
td.today {
	background-position: 81px 0px;
	color: white;
}
td.today:hover {
	background-position: 81px -81px;
}
3

Chúng ta sẽ thêm sự kiện vào cho mỗi ngày, khi đưa chuột vào mỗi ngày, một popup sẽ hiện ra với thông tin sự kiện của ngày đó


<td class="date_has_event">
	13
	<div class="events">
		<ul>
			<li>
				<span class="title">Event 1</span>
				<span class="desc">Lorem ipsum dolor sit amet, consectetu adipisicing elit.</span>
			</li>
			<li>
				<span class="title">Event 2</span>
				<span class="desc">Excepteur sint occaecat cupidatat non proident, sunt in culpa qui officia deserunt mollit anim id est laborum.</span>
			</li>
		</ul>
	</div>
</td>


4

Viết CSS để định dạng cho popup về sự kiện của từng ngày

.events {
	position: relative;
}
.events ul {
	text-align: left;
	position: absolute;
	display: none;
	z-index: 1000;
	padding: 15px;
	background: #E7ECF2 url(../img/popup.png) no-repeat;
	color: white;
	border: 1px solid white;
	font-size: 15px;
	width: 200px;
	-moz-border-radius: 3px;
	-khtml-border-radius: 3px;
	-webkit-border-radius: 3px;
	-border-radius: 3px;
	list-style: none;
	color: #444444;
	-webkit-box-shadow: 0px 8px 8px #333;
}
.events li {
	padding-bottom: 5px;
}
.events li span {
	display: block;
	font-size: 12px;
	text-align: justify;
	color: #555;
}
.events li span.title {
	font-weight: bold;
	color: #222;
}
5

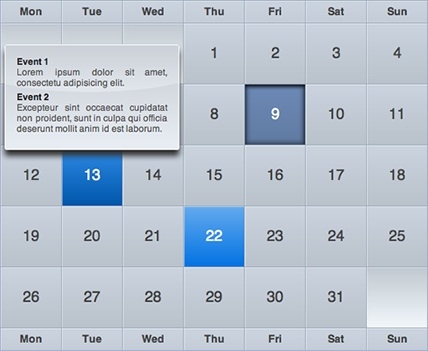
Cuối cùng, viết đoạn javascript để xử lý sự kiện

$(function () {
	$('.date_has_event').each(function () {
		// options
		var distance = 10;
		var time = 250;
		var hideDelay = 500;
 
		var hideDelayTimer = null;
 
		// tracker
		var beingShown = false;
		var shown = false;
 
		var trigger = $(this);
		var popup = $('.events ul', this).css('opacity', 0);
 
		// set the mouseover and mouseout on both element
		$([trigger.get(0), popup.get(0)]).mouseover(function () {
			// stops the hide event if we move from the trigger to the popup element
			if (hideDelayTimer) clearTimeout(hideDelayTimer);
 
			// don't trigger the animation again if we're being shown, or already visible
			if (beingShown || shown) {
				return;
			} else {
				beingShown = true;
 
				// reset position of popup box
				popup.css({
					bottom: 20,
					left: -76,
					display: 'block' // brings the popup back in to view
				})
 
				// (we're using chaining on the popup) now animate it's opacity and position
				.animate({
					bottom: '+=' + distance + 'px',
					opacity: 1
				}, time, 'swing', function() {
					// once the animation is complete, set the tracker variables
					beingShown = false;
					shown = true;
				});
			}
		}).mouseout(function () {
			// reset the timer if we get fired again - avoids double animations
			if (hideDelayTimer) clearTimeout(hideDelayTimer);
 
			// store the timer so that it can be cleared in the mouseover if required
			hideDelayTimer = setTimeout(function () {
				hideDelayTimer = null;
				popup.animate({
					bottom: '-=' + distance + 'px',
					opacity: 0
				}, time, 'swing', function () {
					// once the animate is complete, set the tracker variables
					shown = false;
					// hide the popup entirely after the effect (opacity alone doesn't do the job)
					popup.css('display', 'none');
				});
			}, hideDelay);
		});
	});
});
6

Download source code và xem demo của bài viết này bên dưới.

Chia sẻ:
loading...

Bình luận